


What is computer recovery? Explaining how to use recovery disc

Computer recovery is the process of returning your computer to its initial state. If something goes wrong or there is a risk of virus infection, recovery is an effective solution. In this article, we will explain the basic knowledge of recovery and how to use recovery discs in an easy-to-understand manner. We will also explain recovery procedures on Windows and Mac and the importance of data backup. Finally, we will discuss what to do if recovery is not possible and troubleshooting that you should try before recovery.
Clickable table of contents
- 1 What is computer recovery? Difference between recovery and clean install, recovery method and precautions
- 2 Recovery procedure for Windows 10 and 11 computers
- 3 Recovery procedure on Mac: How to use recovery mode
- 4 How to create and use a recovery disk (USB)
- 5 Initial settings after recovery and installation of recommended apps
- 6 Importance and method of data backup during computer recovery
- 7 What to do if the recovery disc is missing, not included, or lost
- 8 How to create and use a recovery drive for recovery
- 9 What to do if computer recovery doesn't work
- 10 Troubleshooting to try before recovery
- 11 Summary: Get a comfortable PC experience with PC recovery
What is computer recovery? Difference between recovery and clean install, recovery method and precautions
Computer recovery means returning your computer to the state it was in when you purchased it. This allows you to resolve system malfunctions and virus infections. Another method of recovery is a clean install. A clean install is a method of returning your computer to its initial state by installing a new OS. The difference between recovery and clean installation is that recovery restores the computer to the initial state provided by the computer manufacturer, while clean install restores the computer to the initial state provided by the OS manufacturer.
When performing recovery, it is important to first back up your data. Recovery may erase data on your computer, so it is recommended to save important data to external storage beforehand. Also, don't forget to prepare the applications and drivers that will be needed after recovery.
Recovery procedure for Windows 10 and 11 computers
How to recover Windows 10
The steps to perform recovery on Windows 10 are as follows.
- Open the Start menu and click Settings.
- Select Update & Security.
- Click "Recovery" from the left menu, then press the "Start" button under "Initialize this PC" that appears on the right screen.
- Select "Delete all files" or "Keep my files." If you want to completely erase unnecessary data, choose the former, and if you want to keep important data, choose the latter.
- Click the "Reset" button to begin recovery.
Never turn off your computer during the recovery process. Also, be sure to back up your data, as failures may occur during the process. Once the recovery is complete, your computer will return to its factory state. You will then be able to perform the initial setup and reinstall and use the applications you need.
How to recover Windows 11
The steps to perform recovery on Windows 11 are as follows.
- Open the Start menu and click Settings.
- Select "System" and click "Recovery".
- Press the "Start" button under "Initialize this PC".
- Select "Delete all files" or "Keep my files." If you want to completely erase unnecessary data, choose the former, and if you want to keep important data, choose the latter.
- Click the "Reset" button to begin recovery.
Even in Windows 11, do not turn off the computer during recovery work. It is also important to back up your data. Once the recovery is complete, your computer will return to its factory condition.
Return to state. You will then be able to perform the initial setup and reinstall and use the applications you need.
Recovery procedure on Mac: How to use recovery mode
The steps to perform recovery on Mac are as follows.
- Shut down your Mac.
- Press the power button and immediately press and hold the "Command" and "R" keys at the same time. Keep holding the keys until you see the recovery mode screen.
- On the screen that appears, select "Disk Utility" and click "Continue".
- Select the disk you want to recover from the list on the left and click the Erase tab.
- Select the disk format and press the "Erase" button. When the disk is erased, Disk Utility closes.
- Return to the screen and select "Reinstall macOS" and click "Continue."
- Select the installation destination disk and press the "Install" button. Once the installation is complete, your Mac will restart.
When performing recovery on your Mac, never turn off the power while the recovery process is in progress. It is also important to back up your data. Once the recovery is complete, your Mac will be returned to its factory state. You will then be able to perform the initial setup and reinstall and use the applications you need.
How to create and use a recovery disk (USB)
A recovery disk is a disk used to restore the operating system in the event of a computer failure or malfunction. By creating a recovery disc, you can quickly deal with an emergency.
How to create a recovery disc (Windows)
- Connect the USB memory to your computer. Please use one with a capacity of 8GB or more.
- Open the Start menu and click Control Panel.
- Select "System and Security" and click "File History".
- Select "System Image Backup" from the left menu, then click "Create System Repair Disk" on the right side of the screen.
- Select your drive and press the "Create Disc" button. Once creation is complete, a recovery disk will be created on the USB memory.
How to use recovery discs (Windows)
- Shut down your computer and insert the recovery disc you created.
- Press the power button and then press the key to enter the BIOS screen (usually F2, F12, Delete, etc.) when the computer boots.
- In the BIOS screen, change the boot device priority so that the recovery disk has the highest priority.
- Save your settings and restart your computer. When you boot from the recovery disc, recovery steps will be displayed, so follow the instructions.
Macs have an Internet recovery feature instead of a recovery disc. By using this function, you can restore the OS via the Internet. To use Internet Recovery, press and hold the Option, Command, and R keys while starting your Mac.
Initial settings after recovery and installation of recommended apps
Once the recovery is complete, first perform the initial settings. Follow the on-screen instructions to complete settings such as language, keyboard layout, Wi-Fi settings, and entering account information. After completing the initial settings, install the necessary applications.
Below are some apps recommended to install after recovery.
- Antivirus software: Antivirus software is essential to ensure security. Choose something reliable, such as Windows Defender, Avast, or Norton. It is also important to regularly update virus definition files and keep them up to date.
- Office suite: If you need software for word processing and spreadsheets, install something like Microsoft Office, Google Workspace, or LibreOffice. These applications are frequently used for business and academic purposes, so it is useful to have them installed.
- Web browser: After recovery, we recommend that you install a web browser that you are comfortable using, such as Google Chrome, Mozilla Firefox, or Microsoft Edge, in addition to the default browser. Each browser has its own extensions and features, so consider using multiple browsers depending on your needs.
- Media Player: Install VLC media player, Windows Media Player, iTunes, etc. to enjoy videos and music. These applications are suitable for playing multimedia content as they support a variety of file formats.
- Compression/decompression software: Install WinRAR, 7-Zip, WinZip, etc. to compress and decompress files. These applications help you send and receive files and save storage space. You can also improve the security of your files by using the encryption feature.
- Cloud storage clients: Install client applications for Google Drive, Dropbox, and OneDrive for backup and file sharing. This allows you to easily manage your cloud storage.
PDF viewing/editing software: Install Adobe Acrobat Reader, Foxit Reader, PDF-XChange Viewer, etc. to handle PDF files. These applications allow you to view and edit PDF files, making them useful for business and academic purposes.
When installing these applications, it is important to always choose the latest version. Also, uninstall unnecessary applications to maintain your computer's performance.
Importance and method of data backup during computer recovery
Data backup is very important when performing computer recovery. Recovery returns your computer's system to its factory state, so saved data may be lost. Therefore, it is recommended to back up important data before performing recovery.
There are several ways to back up your data, but typically you use external storage devices (USB flash drive, external hard disk, etc.) or cloud storage services (Google Drive, Dropbox, OneDrive, etc.) to save your data. Using these methods, you can easily get your data back after recovery.
It is also recommended that you back up your data regularly. In the unlikely event that your computer malfunctions or is infected with a virus and requires recovery, as long as you have the latest data, you can recover without losing important information. Adjust the frequency of backups depending on the importance of your data and how often it changes. For example, it is appropriate to back up important business data every day, and back up personal photos and videos once a week.
Another way to back up your data is to use backup software. Backup software allows you to automatically back up specified folders and files on a regular basis. In addition, by using functions such as differential backup and incremental backup, you can perform backups efficiently while saving the amount of backup data.
What to do if the recovery disc is missing, not included, or lost
Recovery discs play an important role when recovering your computer. However, even if you don't have a recovery disc, it doesn't come with it, or you've lost it, you can still recover your computer. Below, we will introduce what to do if you do not have the recovery disc at hand.
Use recovery partition
Many computers have a hidden area called the recovery partition. This recovery partition stores the data needed to return your computer to the state it was in when you purchased it. You can access the recovery partition and perform a recovery by pressing certain keys (such as F11 or F12) when turning on your computer.
Create a recovery disc
Even if you do not have a recovery disc at hand, you can create one using another computer. You can create a recovery disk by borrowing a disk from a friend or acquaintance who has a computer of the same make and model, or by downloading a recovery disk image file from the manufacturer's support site and writing it to a USB memory or DVD.
Ask the manufacturer for a recovery disc
If a recovery disc was not included or if you have lost it, you can also request a recovery disc from your computer manufacturer. Contact the manufacturer's support center to find out how to purchase recovery discs. However, there is often a fee, so please consider the cost and effort when making your decision.
Perform a clean install
If you don't have a recovery disc, you can instead use a clean install to restore your computer to its initial state. A clean install reinstalls the operating system (Windows or macOS) to return it to a like-new condition. By creating installation media (USB memory or DVD) and installing it on your computer, you can obtain the same effect as recovery.
Use third-party recovery tools
Even if you don't have recovery discs, you can use third-party recovery tools to restore your computer to its original state. Many recovery tools are paid, but some offer free trials. If you can recover during the trial period, you can save money.
summary
Even if you don't have a recovery disc, it's not included, or you've lost it, you can still recover your computer by trying the method above. Select the appropriate method and follow the precautions to recover your computer.
How to create and use a recovery drive for recovery
A recovery drive is an important tool to help you recover your computer. This article provides detailed instructions on how to create and use a recovery drive.
- How to create a recovery drive First, we will explain how to create a recovery drive. Follow the steps below to create a recovery drive.
Here we will explain how to create a recovery drive in Windows 11.
(1) Prepare a USB memory with at least 4GB of free space. Please note that all data on the USB memory will be erased when creating the recovery drive, so it is important to back up the data in advance.
(2) For Windows, type "Create a recovery drive" in the search box next to the Start menu and open the recovery drive tool that appears. User Account Control will pop up, so click "Yes".
(3) The “Create a recovery drive” window will open, so click “Next”.
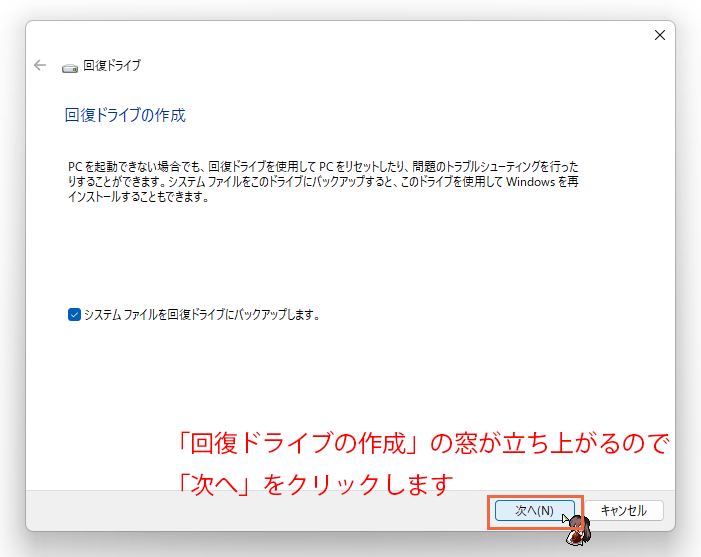
(3) A window like this will appear, so wait for a while.

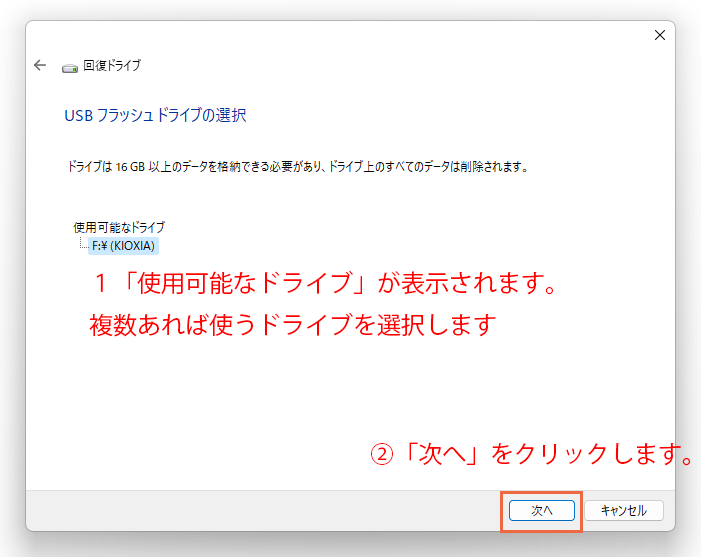
(4) The USB drive selection screen will appear, so ① select the drive you want to use and ② click ``Next''.
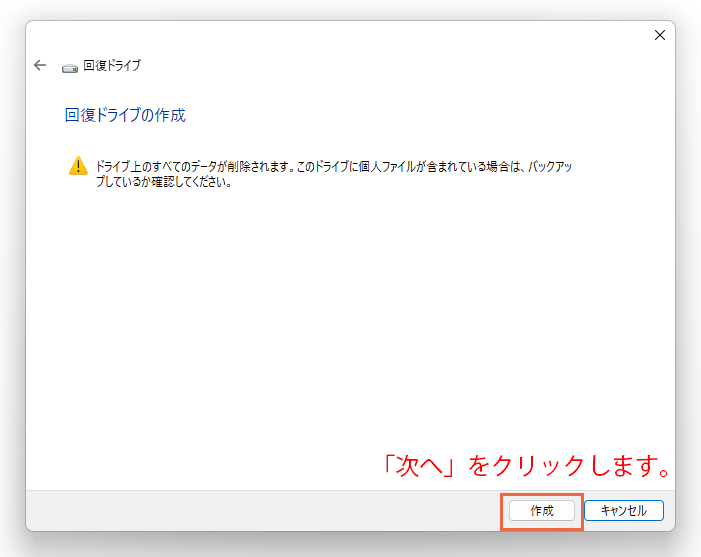
(5) The "Create recovery drive" screen will appear. All data on the drive will be deleted. It is written. If it's OK, click "Next".
(6) A recovery drive is being created.


(7) When the message "The recovery drive is ready" appears, the process is complete. Click the "Finish" button to close the window. You have now successfully created a recovery drive. In my environment it took about 40 minutes.

- How to use the recovery drive This section describes how to use the recovery drive to recover your computer.
(1) Shut down your computer and connect the recovery drive you created to the USB memory.
(2) Start the computer, change the boot device priority on the BIOS screen, and set it to boot from the USB memory. The method of accessing the BIOS screen of each computer is different, so please refer to the manufacturer's support page or manual.
(3) Restart your computer and boot from the recovery drive to display recovery mode. On Windows, select Troubleshoot and click Reset this PC. (4) Follow the instructions to perform recovery and return your computer to its initial state. Once the recovery is complete, you will need to initialize again.
summary
A recovery drive is a useful tool to help you recover your computer. It is important to create a recovery drive on a regular basis and have it ready for emergencies. By performing a recovery using a recovery drive, you can return your computer to a stable state. Please refer to this article to learn how to create and use a recovery drive.
What to do if computer recovery doesn't work
If recovery does not work, there are several possible causes and solutions.
First, your recovery disk or recovery partition may be corrupted. In this case, either recreate the recovery disc or contact your computer manufacturer's support to obtain a recovery disc. Additionally, if your recovery partition is corrupted, please contact your computer manufacturer's support to determine the appropriate course of action.
Secondly, if there is a problem with the computer's hardware, recovery may not be successful. If there is a hardware defect, you will need to have it repaired or replace the defective part. Consult a professional support service or repair company to determine the location of your computer's failure.
Also, if recovery does not work, the BIOS settings of your computer may not be appropriate. When performing a recovery, the boot device priority must be set correctly in the BIOS settings. If you use a recovery disc or USB, set it as your first boot device.
Troubleshooting to try before recovery
Recovery returns your computer's system to its factory state, so saved data may be lost. Therefore, before performing recovery, try the troubleshooting steps below first.
System Restore: You can use the System Restore feature to return your computer to a previous state. This may allow you to undo changes to the program or driver that caused the problem.
Booting in Safe Mode: Safe Mode is a mode in which Windows starts with a minimum number of drivers and programs. If the problem is resolved in Safe Mode, the problem is most likely caused by a program or service that is running while booting in Normal mode. Disable unnecessary programs and services in Safe Mode and check if it works in normal mode.
Scan with antivirus software: Computer problems may also be caused by a virus infection. Use antivirus software to scan your entire computer to detect and remove viruses.
Check your hardware: If you have a problem with your computer's hardware, you can troubleshoot it without doing a recovery. For example, if the cause is a memory problem or hard disk error, replacing those parts may solve the problem.
If these troubleshooting methods do not resolve your issue, consider recovery. However, it is important to always back up your data before performing recovery.
This covers all the factors to consider when considering recovery. Recovery not only improves your computer's performance but also helps resolve problems. However, it is important to try troubleshooting methods and back up your data before performing a recovery. By following the appropriate steps, your computer recovery will proceed smoothly and you will be able to use your computer comfortably.
Summary: Get a comfortable PC experience with PC recovery
This article covers basic knowledge and procedures for computer recovery, the importance of data backup, initial settings after recovery and installation of recommended apps, what to do if recovery does not work, and troubleshooting that you should try before recovery. I introduced the method.
Recovery is an effective way to resolve computer problems and rebuild a comfortable usage environment, but it is important to understand and implement the appropriate procedures and precautions. By remembering to back up your data and following each step, you can successfully recover your computer.
We hope that this information will help you consider recovering your computer and resolve the issue. Finally, after the recovery is complete, you can use your computer even more comfortably and safely by installing recommended apps and applying security measures and the latest updates for your computer. We hope this article will be useful for your computer recovery.