


Easy solution! Causes and solutions when your computer won't start after adding memory

How to find out the cause of not starting after adding memory
- Check if memory is fully installed
- Check if the memory is compatible with your computer and motherboard
- If there is more than one, try unplugging and plugging them one by one to see if they start up.
- Try discharging your computer
- Restore BIOS (UEFI) settings to default
- Suspect initial failure
These are the items to check after adding memory.
Please take a look at the article as it is explained in detail.
Clickable table of contents
- 1 Benefits of increasing memory and why it is necessary
- 2 What you need to know before adding memory: How to choose and compatibility
- 3 Reasons for not starting after adding memory
- 4 Troubleshooting: Practical solutions
- 5 Best Practices for Memory Expansion: Safe Procedures
- 6 Final checklist: The road to trouble-free memory expansion
- 7 Summary: Get a new PC experience by increasing memory
Benefits of increasing memory and why it is necessary
Increasing memory capacity is an effective way to significantly improve your computer's performance.
Memory (RAM) functions as a computer's work area and is directly linked to its ability to run many programs and files at the same time. If you don't have enough memory, your computer may slow down or programs may stop responding, so adding more memory will solve that problem.
For example, image and video editing software requires large amounts of memory. By increasing the memory, these software will run smoothly and you will be able to work more efficiently.
Therefore, increasing memory is an important way to increase work efficiency and provide a comfortable computer usage experience, especially when performing memory-intensive tasks.
Improve computer performance
Increasing your computer's memory will make it run faster.
Memory is the place where your computer temporarily stores the information it is currently using. The larger this space is, the faster your computer will be able to process more information at the same time.
For example, when you have many web pages open at the same time, your computer will become slow if you don't have enough memory. However, if you increase the memory, it will run faster even when you open a lot of web pages.
So, if you want to increase the speed of using your computer, increasing the memory is a good way. This can be a very helpful improvement method, especially for people who want to do many things at once.
Comfortable use of games and software
Increasing memory is a very effective way to comfortably use games and certain software.
Memory is like a computer's "workbench" and can handle a lot of information at the same time. When playing games or using heavy software, having a spacious "workbench" will allow you to run smoothly.
When playing your child's favorite 3D game, the screen may become choppy and you may not be able to enjoy it. This stuttering problem is often caused by insufficient memory. Adding more memory will help your games run more smoothly and your child will have more fun playing them.
Increasing your memory is an easy way to enjoy more games and software. If you want to use your computer comfortably without stuttering, we highly recommend adding more memory.
What you need to know before adding memory: How to choose and compatibility
Please refer to this article for information on how to increase memory.
How to increase memory
Before adding memory, understand that it is important to choose the appropriate memory and check compatibility.
Memory is a component that is directly linked to the speed of your computer, so compatibility with your computer is important when choosing memory. If you choose the wrong memory, your computer may not start, so it is essential to choose the correct memory and check compatibility.
For example, it may be better to choose high-speed memory to enjoy games comfortably, but if the model number of your computer and the model number of the memory do not match, your computer may not start up. If you carefully check the model number and spec sheet and consult with the staff at a specialty store, your chances of failure will be greatly reduced.
Before adding more memory, it's important to learn how to choose the right memory for your computer and make sure it's compatible. This makes it possible to safely and efficiently improve the performance of your computer.
Please refer to this article for memory guidelines.
How much memory do you need for your computer? What is the capacity and usage rate?
How to check memory compatibility
When adding memory to your computer, it is essential to check compatibility. There are some easy ways to do that.
If the memory is not compatible, your computer may not work properly, or in the worst case scenario, it may not start up. By checking compatibility, you can prevent such problems from occurring.
To check compatibility, first check your computer model number and existing memory standards. It is best to refer to the manufacturer's official website or instruction manual. Next, check whether the memory you are considering purchasing matches the model number and specifications. If you have any questions, be sure to consult the staff at a specialty store.
Compatibility confirmation is required when adding memory. By carefully checking the model number and specifications and consulting with a specialist if necessary, you can choose memory with confidence. Even if you are a beginner, you can safely improve your computer's performance by following these steps.
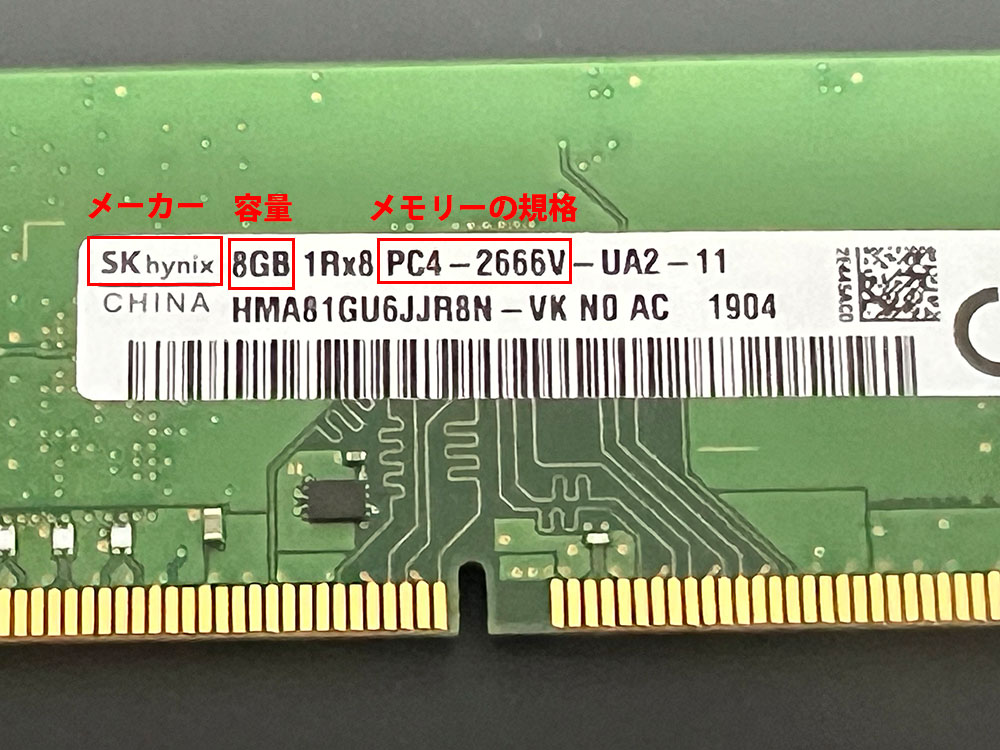
The image below explains the various elements of memory. Please note that the location listed differs depending on the manufacturer.
Points to consider when purchasing additional memory
When expanding memory, it is important to keep in mind the points to consider when making an appropriate purchase. Points to consider when purchasing are compatibility, capacity, and quality.
If the memory you choose is not compatible with your computer, your computer's performance will not improve, and in some cases, it may cause trouble. You need to carefully consider and choose.
First, to check compatibility with your computer, check the computer and motherboard manufacturer's website for compatible model numbers and standards. Next, decide how much memory you want to add based on your current memory capacity, and select the required capacity. You can also ensure quality by purchasing from trusted brands and retailers.
When purchasing additional memory, the important points are checking compatibility, selecting capacity, and paying attention to quality. By carefully considering these points, you will be able to avoid unnecessary purchases and achieve the desired performance improvement of your computer. Even beginners can succeed in memory expansion by understanding these points and making choices.
Reasons for not starting after adding memory
I added more memory, but my computer won't start up. Such troublesome situations can be dealt with properly if you know the cause.
There may be several reasons why your computer won't start up after adding memory. The main causes include the memory not fitting properly, the purchased memory not matching well with the computer, or something wrong with the new memory.
For example, Mr. A purchased and installed new memory. However, I applied a little too much force and the memory was inserted at an angle, or it was inserted only shallowly. As a result, the computer did not start properly. Also, although Mr. B carefully installed the memory, the memory he purchased did not match his computer. That's why it failed to start.
If a problem occurs after adding memory, don't rush to find the cause. Many problems can be resolved by carefully checking the installation method and type of memory. Don't worry, let's deal with it little by little.
If your computer starts up but the screen is black, there may be a memory problem.
Please see this article.Causes and solutions for black screen when computer won't start up
Improper installation of additional memory
When a computer does not start after adding memory, it is often due to improper installation of the additional memory. However, you can easily solve the problem by just focusing on some easy-to-understand points.
If you install the memory in the wrong direction or do not insert it firmly, the computer and memory will not communicate properly. As a result, startup fails.
For example, Mr. C tried increasing memory for the first time. However, when I inserted the memory, it was a little slanted so it didn't make good contact. When I started up my computer, nothing was displayed and I was left scratching my head. However, by reconsidering the installation method and fitting the memory properly, I was able to start it up successfully.
Improper memory installation is a common problem for beginners. However, if you don't panic and check the direction and depth of attachment, most problems will be resolved. By proceeding slowly and checking without fear of failure, you will be able to successfully expand the memory.
If the additional memory is unsupported memory
If your computer does not start after adding memory, it may be because you have selected incompatible memory. It's important to understand how to choose the right memory.
Computer motherboards support specific memory standards and speeds. If you install memory that does not match this, your computer may not function properly.
Mr. A wanted to add more memory to his computer. However, I bought memory based on its appearance without doing proper research, and as a result, my computer no longer started after I installed it. As it turned out later, the memory that Mr. A had selected was not compatible with the speed of his computer.
When adding memory, it is important to check the compatibility of the memory with your computer. Check the compatible memory standards and speeds in your computer's manual or manufacturer's website. Even if you are a beginner, a little research will help you make the right choice. Please feel free to try it.
If the additional memory is initially defective
Although the number of cases has decreased considerably recently, if your computer does not start after adding memory, it may be because the memory you purchased was initially defective.
Memory is made up of minute parts, and initial failures may occur due to minute defects during the manufacturing process or damage during transportation. If you use such a defective product, your computer will not start properly.
Mr. B purchased new memory and tried to expand it. Even though I selected and carefully installed the correct memory, my computer no longer boots. When I contacted support, they discovered that the memory had a manufacturing defect and would be replaced. Because it was an initial defective product, it did not work properly.
Considering the possibility that the product is initially defective, we recommend purchasing from a reliable retailer when expanding memory. Even in the unlikely event of a problem, being able to receive support quickly will allow you to proceed with your work with peace of mind. Appropriate selection and installation will lead to successful memory expansion.
Motherboard BIOS (UEFI) configuration error
A motherboard BIOS setting error may be one reason why your computer won't start after adding memory.
The BIOS (UEFI) controls the basic operations of your computer, and misconfigurations here will directly affect your computer's startup. After adding memory, errors may occur if the new memory and old settings do not match.
Mr. A installed additional memory on his own, but was having trouble starting his computer. When I went to see a technician, it was discovered that the BIOS settings were outdated and did not match with the new memory. By updating the settings, it started up successfully and the memory expansion was also successful.
When adding memory, it is important to also check the motherboard's BIOS settings and update them if necessary. Proper settings will help your computer run smoothly. If you are not confident, you may feel relieved by receiving professional support. Even if you are a first-time user, if you follow the correct steps, the expansion will be successful.
Charging and static electricity problems
Charges and static electricity may be the cause of problems where your computer won't start after adding memory.
Internal components such as memory have extremely fine structures and can be destroyed by static electricity. It is possible that minute electrical charges generated from the human body during work may damage the parts.
When Mr. B tried to install more memory by himself, he had a habit of rubbing his hands together, which generated static electricity. This static electricity came into contact with the new memory, causing the component to break. As a result of taking it to a specialized store, a new memory was required.
When expanding memory, it is important to take precautions such as grounding yourself by touching a metal object before working to prevent problems caused by static electricity or static electricity. By receiving support from a specialty store or proceeding with caution by wearing conductive gloves, you will be able to successfully expand the memory.
Troubleshooting: Practical solutions
What to do when your computer won't start after adding memory requires simple and effective troubleshooting.
Reason: This issue can occur due to various reasons. If you make a mistake, it may cause further problems, so it is important to check and correct the problem in a step-by-step manner.
Specific example: When Mr. A faced the problem of his computer not starting after adding memory, he took the following steps.
- Reconfirmed memory installation: There was a possibility that the memory was not installed correctly, so we checked again.
- BIOS setting confirmation: Checked the BIOS settings for errors.
- Excluding unsupported memory: Considering the possibility that the memory is unsupported, we attempted to start using only the old memory.
- In the end, I found out that the problem was due to memory installation, and installing it correctly resolved the issue.
It is important to be careful and step-by-step when troubleshooting problems when the computer does not start after adding memory. By narrowing down the cause and dealing with it, you will be able to effectively resolve the problem. Another option is to seek professional support if needed.
How to install memory correctly
Understanding and practicing the correct method of installing memory is a basic step in preventing computer problems.
Memory greatly affects the speed and comfort of your computer. However, incorrect installation may cause problems such as system instability or failure to start, so it must be done carefully.
When installing memory, Mr. B took the following steps.
- I turned off my computer, unplugged the power cord, and removed the battery.
- I unlocked the memory slot and gently pushed the memory in. At this time, I was careful to match the notches.
- Confirm that the lock returns with a click sound, and installation is complete.
Mr. B worked carefully and was successful.
By following the correct method of installing memory, you can prevent problems later on. Even if you are a first-time user, it is important to understand the steps thoroughly and proceed without rushing. If you are unsure, one option is to ask a professional.
Check and adjust BIOS (UEFI) settings
Checking and adjusting BIOS (UEFI) settings is an important means of resolving computer problems, so basic knowledge and understanding of the procedures are essential.
BIOS (UEFI) manages the basic settings when a computer starts up. This is because problems may occur if the settings are not made properly after changing hardware such as adding memory.
Mr. C's computer no longer starts after adding memory. Therefore, we took the following actions.
- You started your computer and entered the BIOS screen by pressing a designated key (often "F2" etc.).
- I checked the memory settings and boot order in the settings menu such as "Advanced".
- I made the necessary adjustments and saved the settings with "Save & Exit".
With this action, the computer started normally.
Checking and adjusting BIOS (UEFI) settings may seem a little difficult for beginners, but if you follow the steps correctly, you can solve many problems. If you are unsure, it is best to consult the manual or seek professional help.
Best Practices for Memory Expansion: Safe Procedures
When increasing memory, advance planning and following the correct steps are essential to avoid problems.
Reason: Installing more memory is a common way to improve the performance of your computer, but care must be taken as it can be damaged due to incorrect handling.
Specific example: When Mr. A planned to increase memory, he took the following steps.
- Selecting compatible memory
- Turn off the power and use a grounding band to prevent static electricity.
- Open your computer and properly insert the new memory into the empty memory slot.
- Close your computer and test startup
By following these steps, we were able to complete the expansion smoothly.
Best practices for memory expansion are a carefully planned series of steps that include checking compatibility, safety precautions, and proper installation methods. This minimizes wasted time and effort, as well as the risk of potential damage.
Static electricity countermeasures when expanding memory
Static electricity countermeasures when expanding memory are an important step to prevent damage to internal components.
Computer components can be easily damaged by static electricity. In particular, when handling memory, it is extremely delicate, so it is essential to take precautions against static electricity.
When Mr. B added memory, he implemented the following static electricity countermeasures.
- Wear a grounding band on your arm to ground yourself.
- Work on a non-conductive work mat.
- Before handling memory, discharge static electricity by touching metal parts.
In this way, the risk of damage from static electricity is minimized.
Preventing static electricity when adding memory is an important step to avoid the risk of damage. You can protect your parts with simple preparations such as using grounding bands and improving your work environment. By following these safe steps, you will be able to proceed with the expansion work without any trouble.
Providing the right tools and environment
Having the right tools and environment for memory expansion is an essential step in increasing efficiency and protecting your equipment.
Computer parts are precision and delicate, and the risk of damage increases if you don't use the right tools. In addition, working in an appropriate environment helps prevent operational errors and injuries.
Mr. A carried out the following steps when proceeding with memory expansion.
- Prepare a special screwdriver and turn the screw without using excessive force.
- Place a non-conductive mat on the workbench to secure a working space.
- Work under good lighting and don't forget to check the details.
This preparation ensured that the work went smoothly and that no parts were damaged.
Having the correct tools and environment is the foundation for safely and efficiently performing memory expansion work. Even if you are a beginner, you will be able to work with confidence by keeping these points in mind.
Final checklist: The road to trouble-free memory expansion
In order to achieve trouble-free memory expansion, it is essential to check the final checklist before completing the work.
Adding memory to your computer is a complicated task, and even the slightest mistake can cause system problems. A final checklist is an important step to ensure work completion and accuracy.
When Mr. B restarted his computer after adding memory, he encountered a problem where it would not start. Having a final checklist in place could have prevented the following problems:
- Check the memory installation direction and contact.
- Check for interference with other cables and parts.
- Final check of BIOS settings.
In this way, you can prevent problems from occurring by rechecking your work based on the list.
A final checklist is an effective way to guide your memory expansion efforts to success. By organizing the overall flow of work and checking each step at the end, you will be able to expand memory more safely and efficiently.
Preliminary checklist for memory expansion
Performing a preliminary checklist before adding memory is an important step to avoid problems later on.
A pre-checklist is a preliminary checklist to check configuration and compatibility, which will help you choose the right memory and clarify how to proceed.
Mr. A is thinking of increasing memory. By creating a preliminary checklist, check the following items:
- What type and speed of memory are you currently using?
- Maximum amount of memory supported by the motherboard.
- Take precautions against static electricity and prepare necessary tools.
With this checklist, Mr. A was able to prepare the necessary memory and tools and proceed with the work smoothly.
The preliminary checklist is the first step in memory expansion work. Your role is to organize what to prepare and what to pay attention to so that you can start working without panic or haste. By creating a proper checklist, you will be well on your way to trouble-free memory expansion.
Points to check after adding memory
Knowing the points to check after memory expansion is an important step to confirm whether the expansion has been completed correctly and to be able to use it with peace of mind.
Verification after expansion is performed to check whether the newly added memory is working properly and whether there are any problems with the system. By checking properly, you can prevent problems that may occur later.
After Mr. B added memory, he checked the following points.
- Is the new memory recognized on the BIOS screen?
- Does the OS start normally?
- Has the memory capacity been increased in the system properties?
- Is the system stable in stress tests?
By performing these checks, Mr. B confirmed that the new memory was working properly.
By paying careful attention to the points to check after adding memory, you can confirm that the added memory is working properly. It is important to check before completing the work to avoid any doubts or concerns. Even beginners can complete memory expansion with confidence by checking these points in order.
Summary: Get a new PC experience by increasing memory
Adding memory will make your computer run more smoothly and give you a new experience. If you have the necessary knowledge and tools, it is a task that you can try at home.
There are obvious reasons to add more memory, including better multitasking and use of heavy applications. For example, it will be possible to browse the web while using image editing software. However, if you are not careful during expansion work, problems such as not starting may occur.
Therefore, in this article, we have explained in detail everything from the installation procedure to troubleshooting. We have explained it in easy words so that even beginners can try it. We also introduced how to choose the right tools and a checklist beforehand.
Finally, it is important to understand that memory expansion is done at your own risk, and requires proper procedures and caution. If you want the work to be done reliably, you may want to consider hiring a specialist shop. All in all, I hope this guide helps you enjoy your new PC world to the fullest.